Category Archives: DIY/ Repurpose

Floyd the Camper: the walls are up and the paint going on…

2013-03-05 13.50.23

The excitement of having the new trailer is starting to wear thin. Did we bite off more than we can chew? I hope not, but we are powering through.

2013-04-04 12.59.29

2013-04-04 12.59.48  2013-04-04 13.43.26

We are in the home stretch with putting up walls. YAY! I thought the end would never come! well. at least with putting up walls….

So much cutting….

2013-04-04 20.10.46   2013-04-04 20.11.10

So here we are with the back wall FINALLY done and ready for some primer and paint. I feel like we are moving forward again, because the walls took so much time. I never realized how many curves  and angles we were going to have to cut.

2013-04-05 14.58.42    2013-04-05 14.58.54

This is where I come in. I LOVE to paint, and its a good thing, because there is a lot of it. 🙂

2013-04-05 14.58.10  2013-04-05 14.57.55

These are some of the benches from the dinette, I primed and started to paint. Like, I said earlier, the color we are using for the main walls, benches and couch/bed is called creamy mushroom ( handy husband is not fond of this color). If interested, it was found at the Home Depot by Behr. I think it’s a great neutral for all the pops of color coming later on, you’ll see. 🙂

2013-04-06 14.40.58 2013-04-06 14.41.21

Oh yeah. I almost forgot. I wanted to show how we managed all those curves when cutting out walls….

Well, I got ahold of our some printer paper, but really any paper I am sure would work, and creased them down into the corner curves. Adding and taping paper together as I went. Once I got the whole length, I took a pen and traced the crease in the paper and cut it out, thus, giving us a stencil to use when cutting out pieces of wall. It’s not an exact science, but it helped out a lot with moving the process along and cut down on a little of the frustration. 😉

2013-04-08 14.30.20 2013-04-08 14.30.45

While out in the trailer working along, our little “helpers” are keeping entertained on the couch cushion we moved back inside for now ( not yet recovered, of course. )

“Floyd ” the Camper

2013-03-05 13.50.23

Progress is slowly taking shape. Yay! We are at a point when things are starting to go BACK into the trailer, instead of taking things out. The tricky part now, is putting the walls back in. Why can’t our little Floyd be a prefect square? It would make it so much easier cutting the board for the walls. 🙂 oh well, such is life…. things that are worth it, never come easy.

2013-03-24 14.40.02

There were a few small sections around the door that had some rotten wood, so….. the Handy Husband had to take the door out, put new wood in the frame and put the door back on.

2013-03-24 14.40.24

While he was busy doing that and he gave me the “ok”, I started putting cabinet doors back in. I know it’s really, kinda hard to see but some painting got done as well. For those familiar with my house, it’s the brown gray color that covers a majority of my walls. For those not familiar with my house, the color is creamy mushroom from behr ultra. Go to Home Depot and find it. 😉 I will try to get some more pics to show the color better.

Things are looking up. 😀 Oh! If you can see the floor in the picture above, notice we don’t have a “floor” anymore either. HH ripped up the floor too.  It was an off white tile, reminisce of the old tile found in the elementary schools that have been around FOREVER.  So, after the walls are all in, time to go floor shopping. Still undecided on what type and style of floor we will go with….. ideas?

2013-03-28 16.49.01   2013-03-28 16.48.33

All the benches and bed/couch are currently being stored in the garage, so please excuse the mess. 🙂 A few had some well worn weight baring bars, so we replaced those and the dinette benches got new sides. The couch/bed as well, received a new facing on the bottom of the frame where there is a cabinet door for storage.

2013-03-21 15.30.46   2013-03-28 11.25.48  2013-03-28 19.38.45

Now, this little cabinet door is right above the kitchen sink, and from the looks of it, used to hold a speaker and radio? At least, that’s my guess…

We thought we would do something a little different with it, because the piece of wood we got to cover the odd holes in the front is a little different from the rest of the cabinets. We wanted to put our little campers name somewhere on the trailer and thought this would be a good spot.

I needed to come up with a design for the name, cause how silly would it be, to just have a name painted on a cabinet door? 😀 Since, we are going in the direction of a retro hunter/summer camp theme in the trailer, I thought what about a “stick” frame?

First, I drew up the stick frame the way I wanted it to look and when it was ready to be transferred to the cabinet door, I found some carbon paper and traced it onto  the door. If you look at the second picture above, you might be able to see the transfer of the carbon, its pretty light and hard to see in the picture. Once the frame was painted on, we decided on the font style we wanted, and I just printed out “Floyd” in the chosen font from Windows Word and repeated the process. 🙂

I am just SO excited things are starting to take shape!

Until next time, peace out girl scout. 😉

A Pacific Northwest Body Scrub

body scrub

In the pacific northwest area, we LOVE our java. But, it’s not just for drinking any more. 🙂 Came across this recipe for a body scrub a few weeks ago, and thought I’d whip up a batch and give it a try. I mean, come on, summer is right around the corner and its time to get this skin in summer shape!

I have been using it, like I said , for a few weeks now, every few days in the shower and ,”oh my golly gee-whiz!” the difference it makes! My legs are smoother and softer than ever. The little bumps we get from shaving ( girls you know what I am talking about), yeah, they are gone. So if you have some extra or stale ground coffee just lying around, whip up a batch today!

Coffee Body Scrub

1 CUP of coffee

1/4CUP of sugar

1TBSP + 1 1/2 TSP olive oil

Mix all together and store in an air tight container and keep in the shower if you like. Scrub down at least once a week, and make use to a nice thick moisturizer after the shower, as scrubs tend to dry out skin a little bit. Get ready to show off those legs this spring/summer! 🙂

2013-03-30 10.39.00

Update: “Floyd” the Camper

2013-03-05 13.50.23

ok, so this is how the conversation went the other day…..

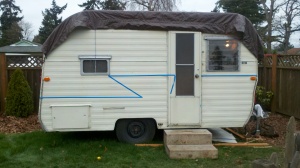
I went in the trailer to observe the progress made, when I noticed something. The wall that was still in the trailer is wood, and although it is painted white, you can still see the wood grain through the paint. The “wall” material the Handy Husband bought to replace the parts we had to rip out was something smooth, like a particle board material ( I don’t know what it’s really called)…..

“Um… Did you realise we have two different wall materials, and although its going to be painted, it is noticeable they are different. ”

“CRAP!”

This did not make Handy Husband happy, but he understood and knew what had to be done.

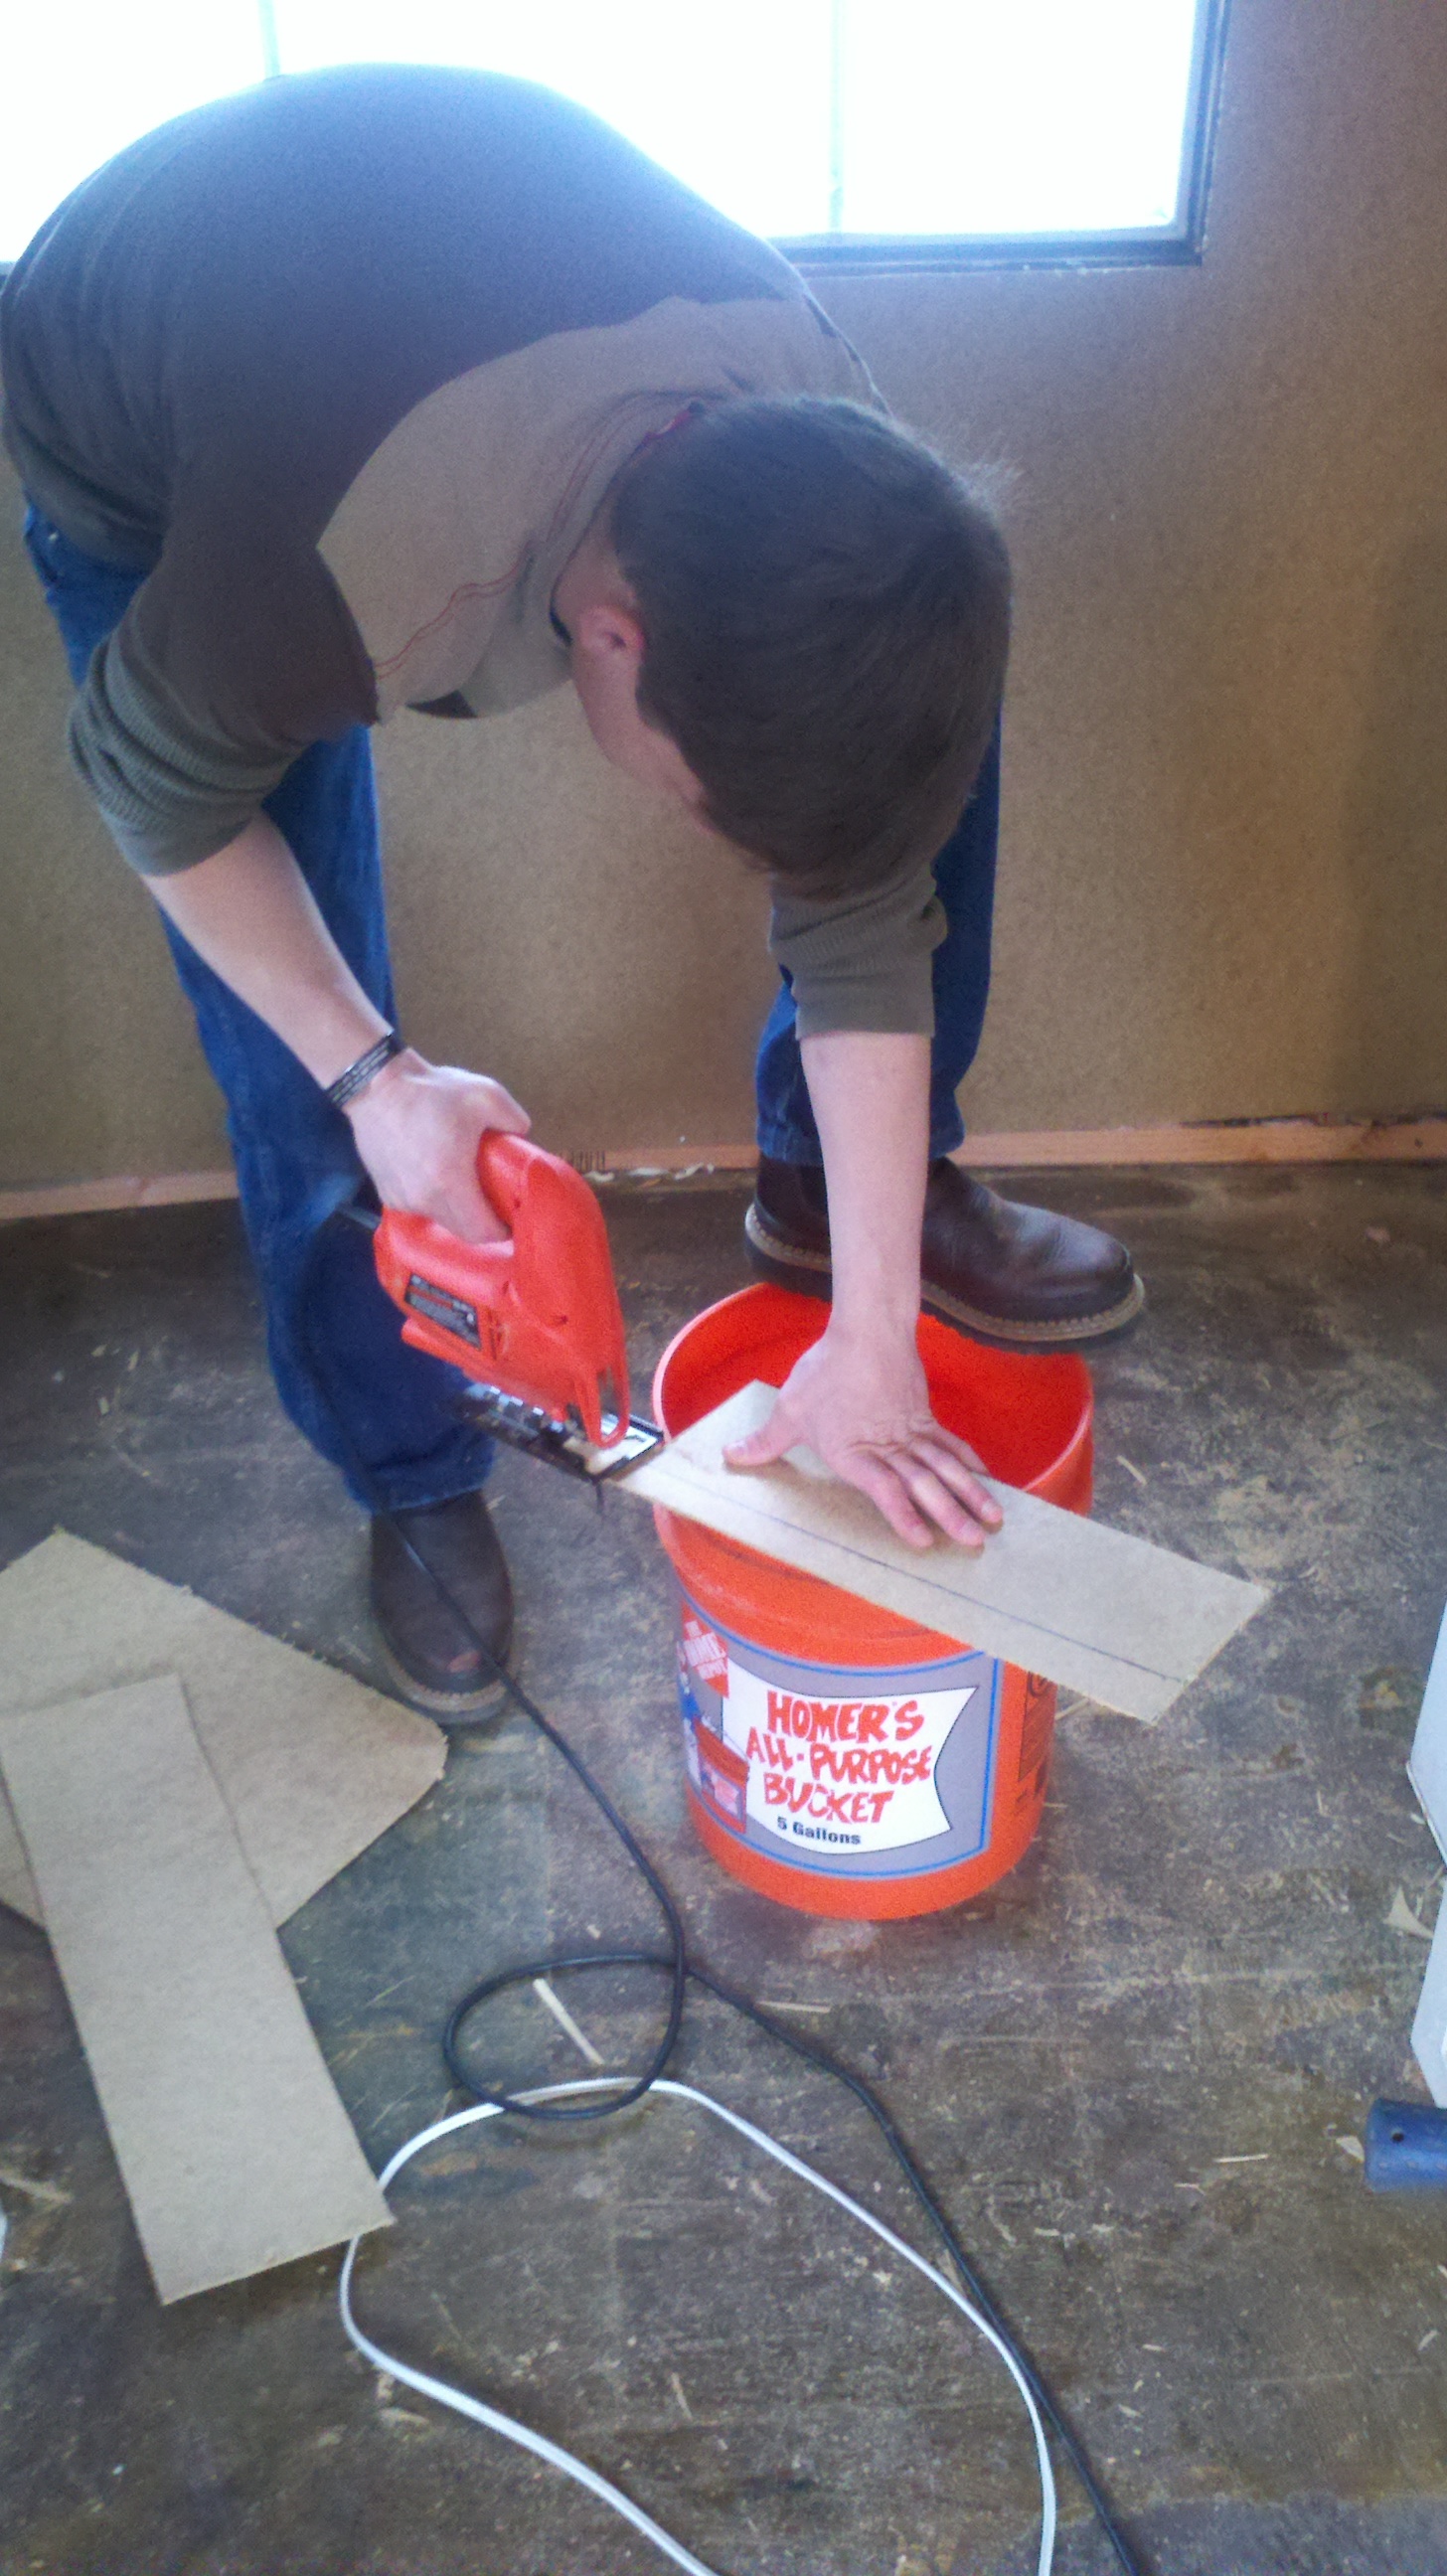
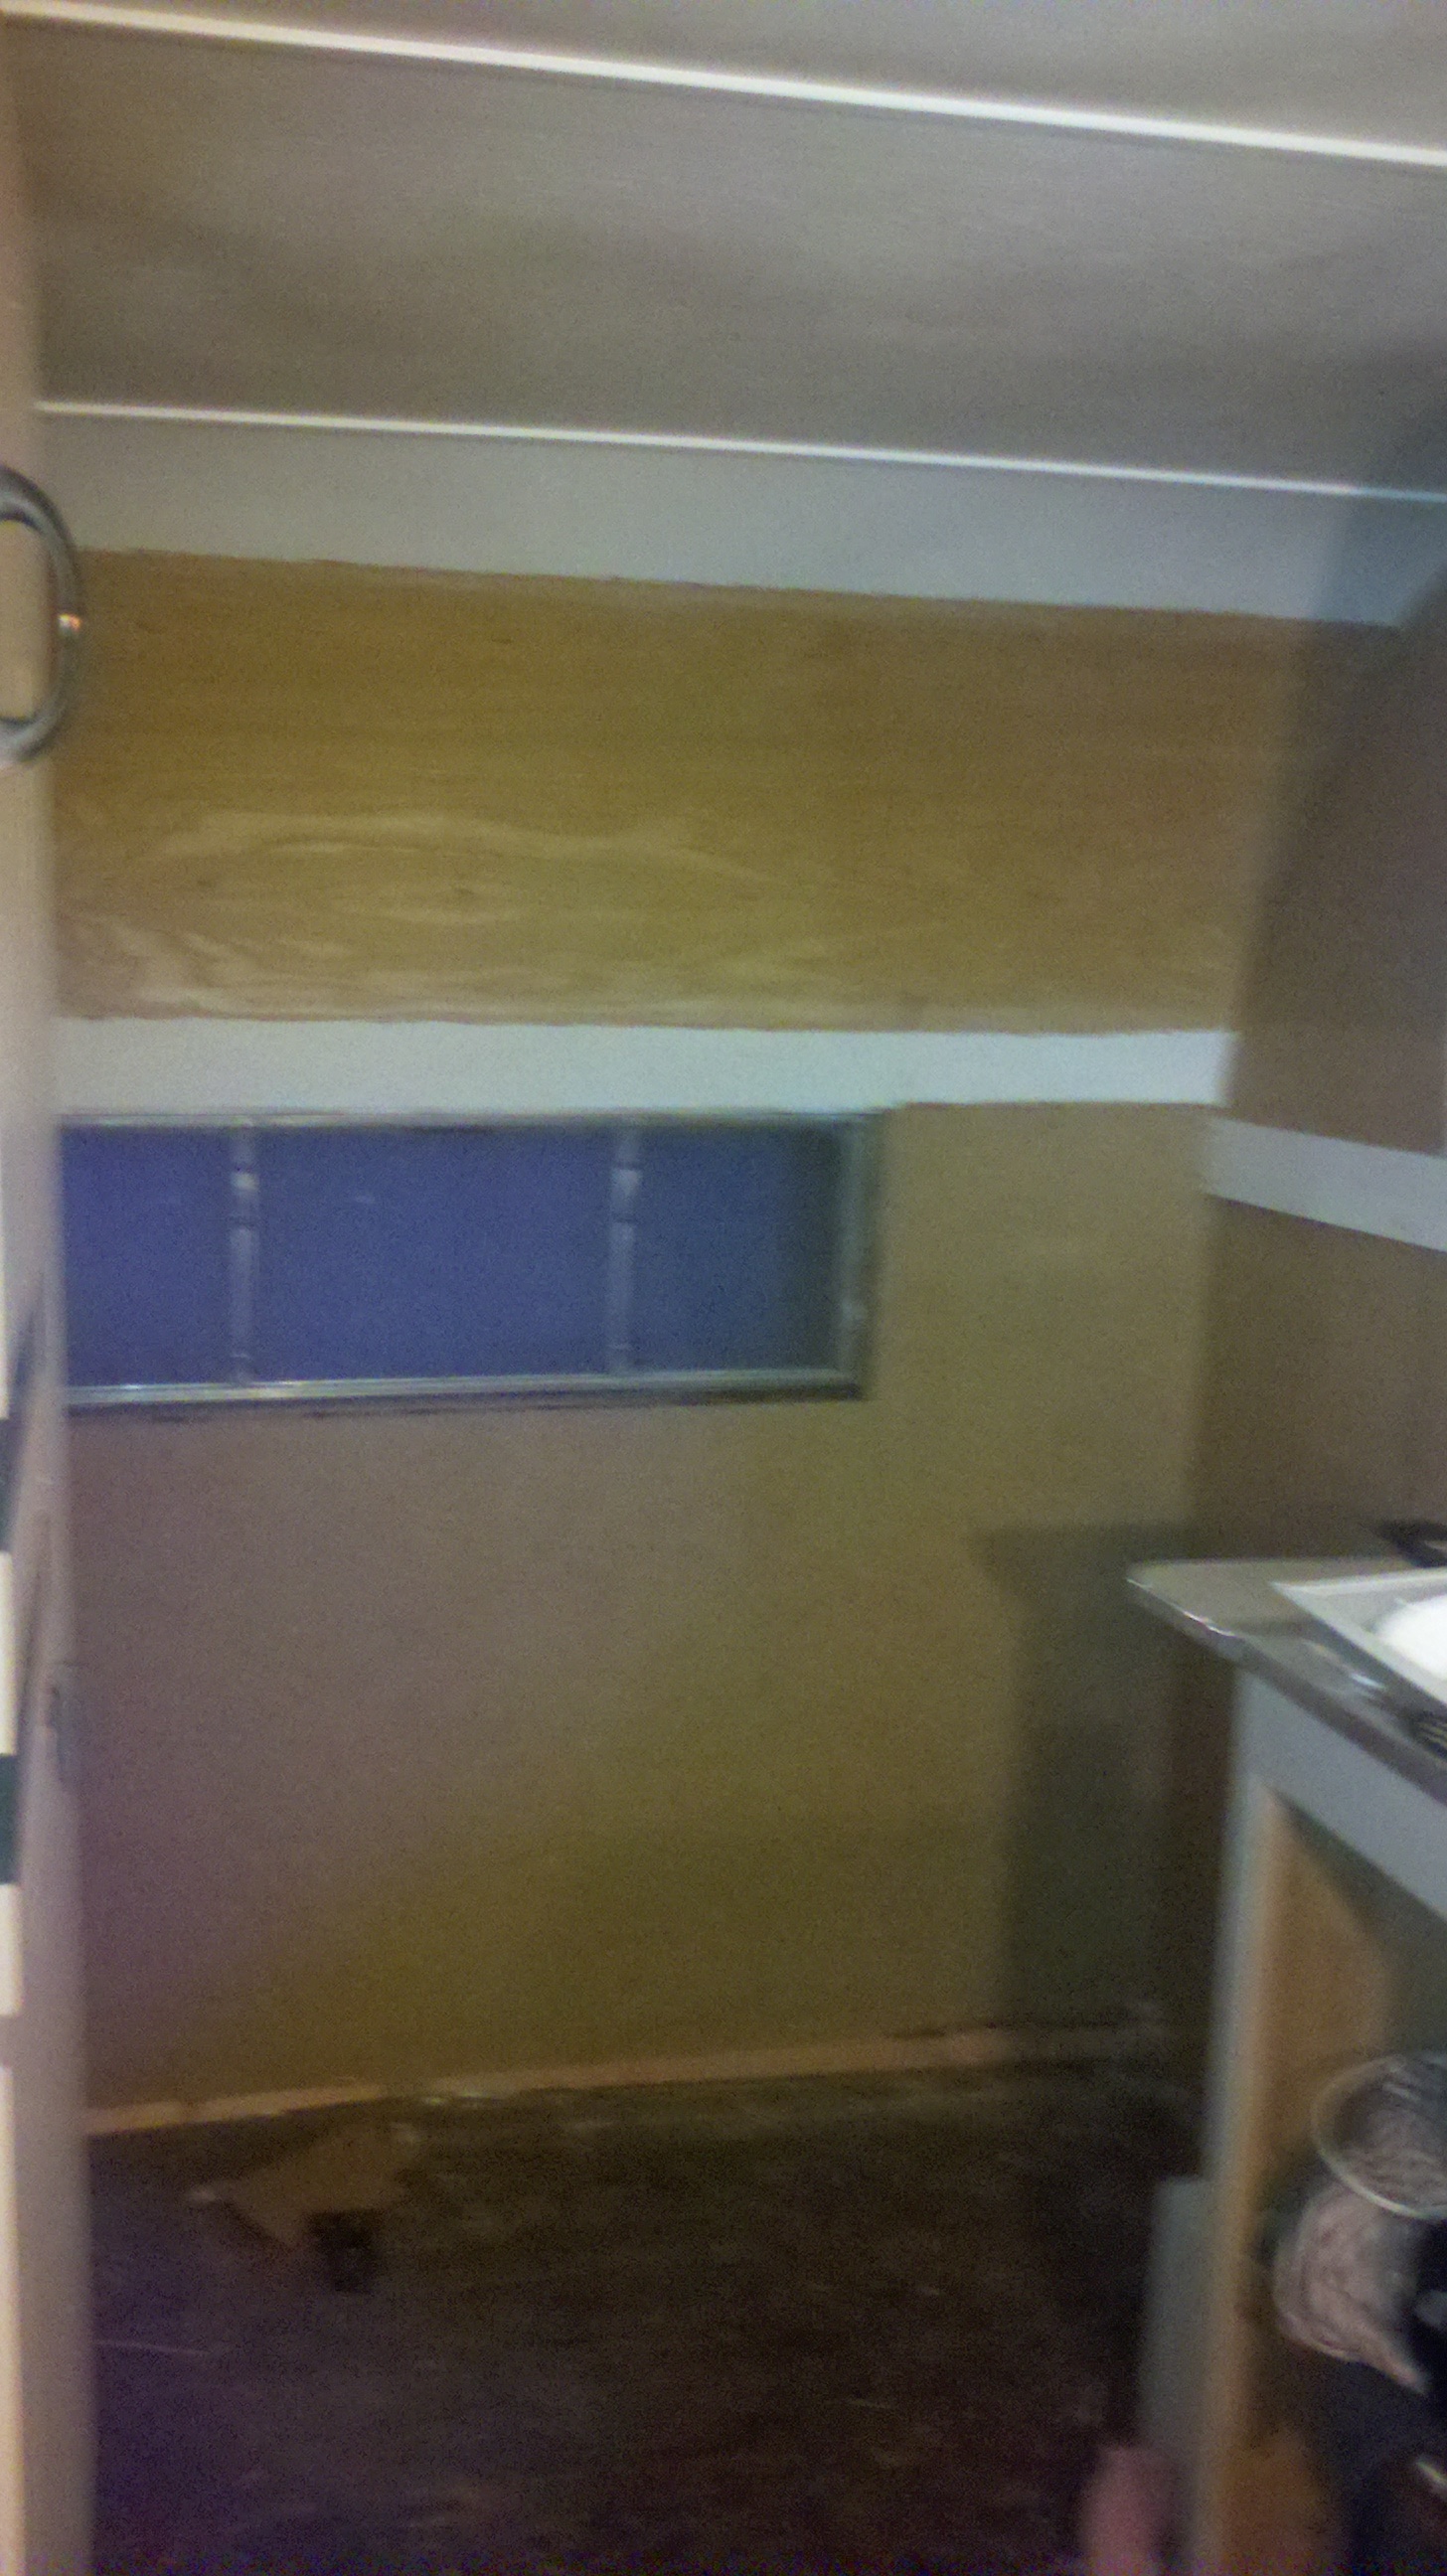
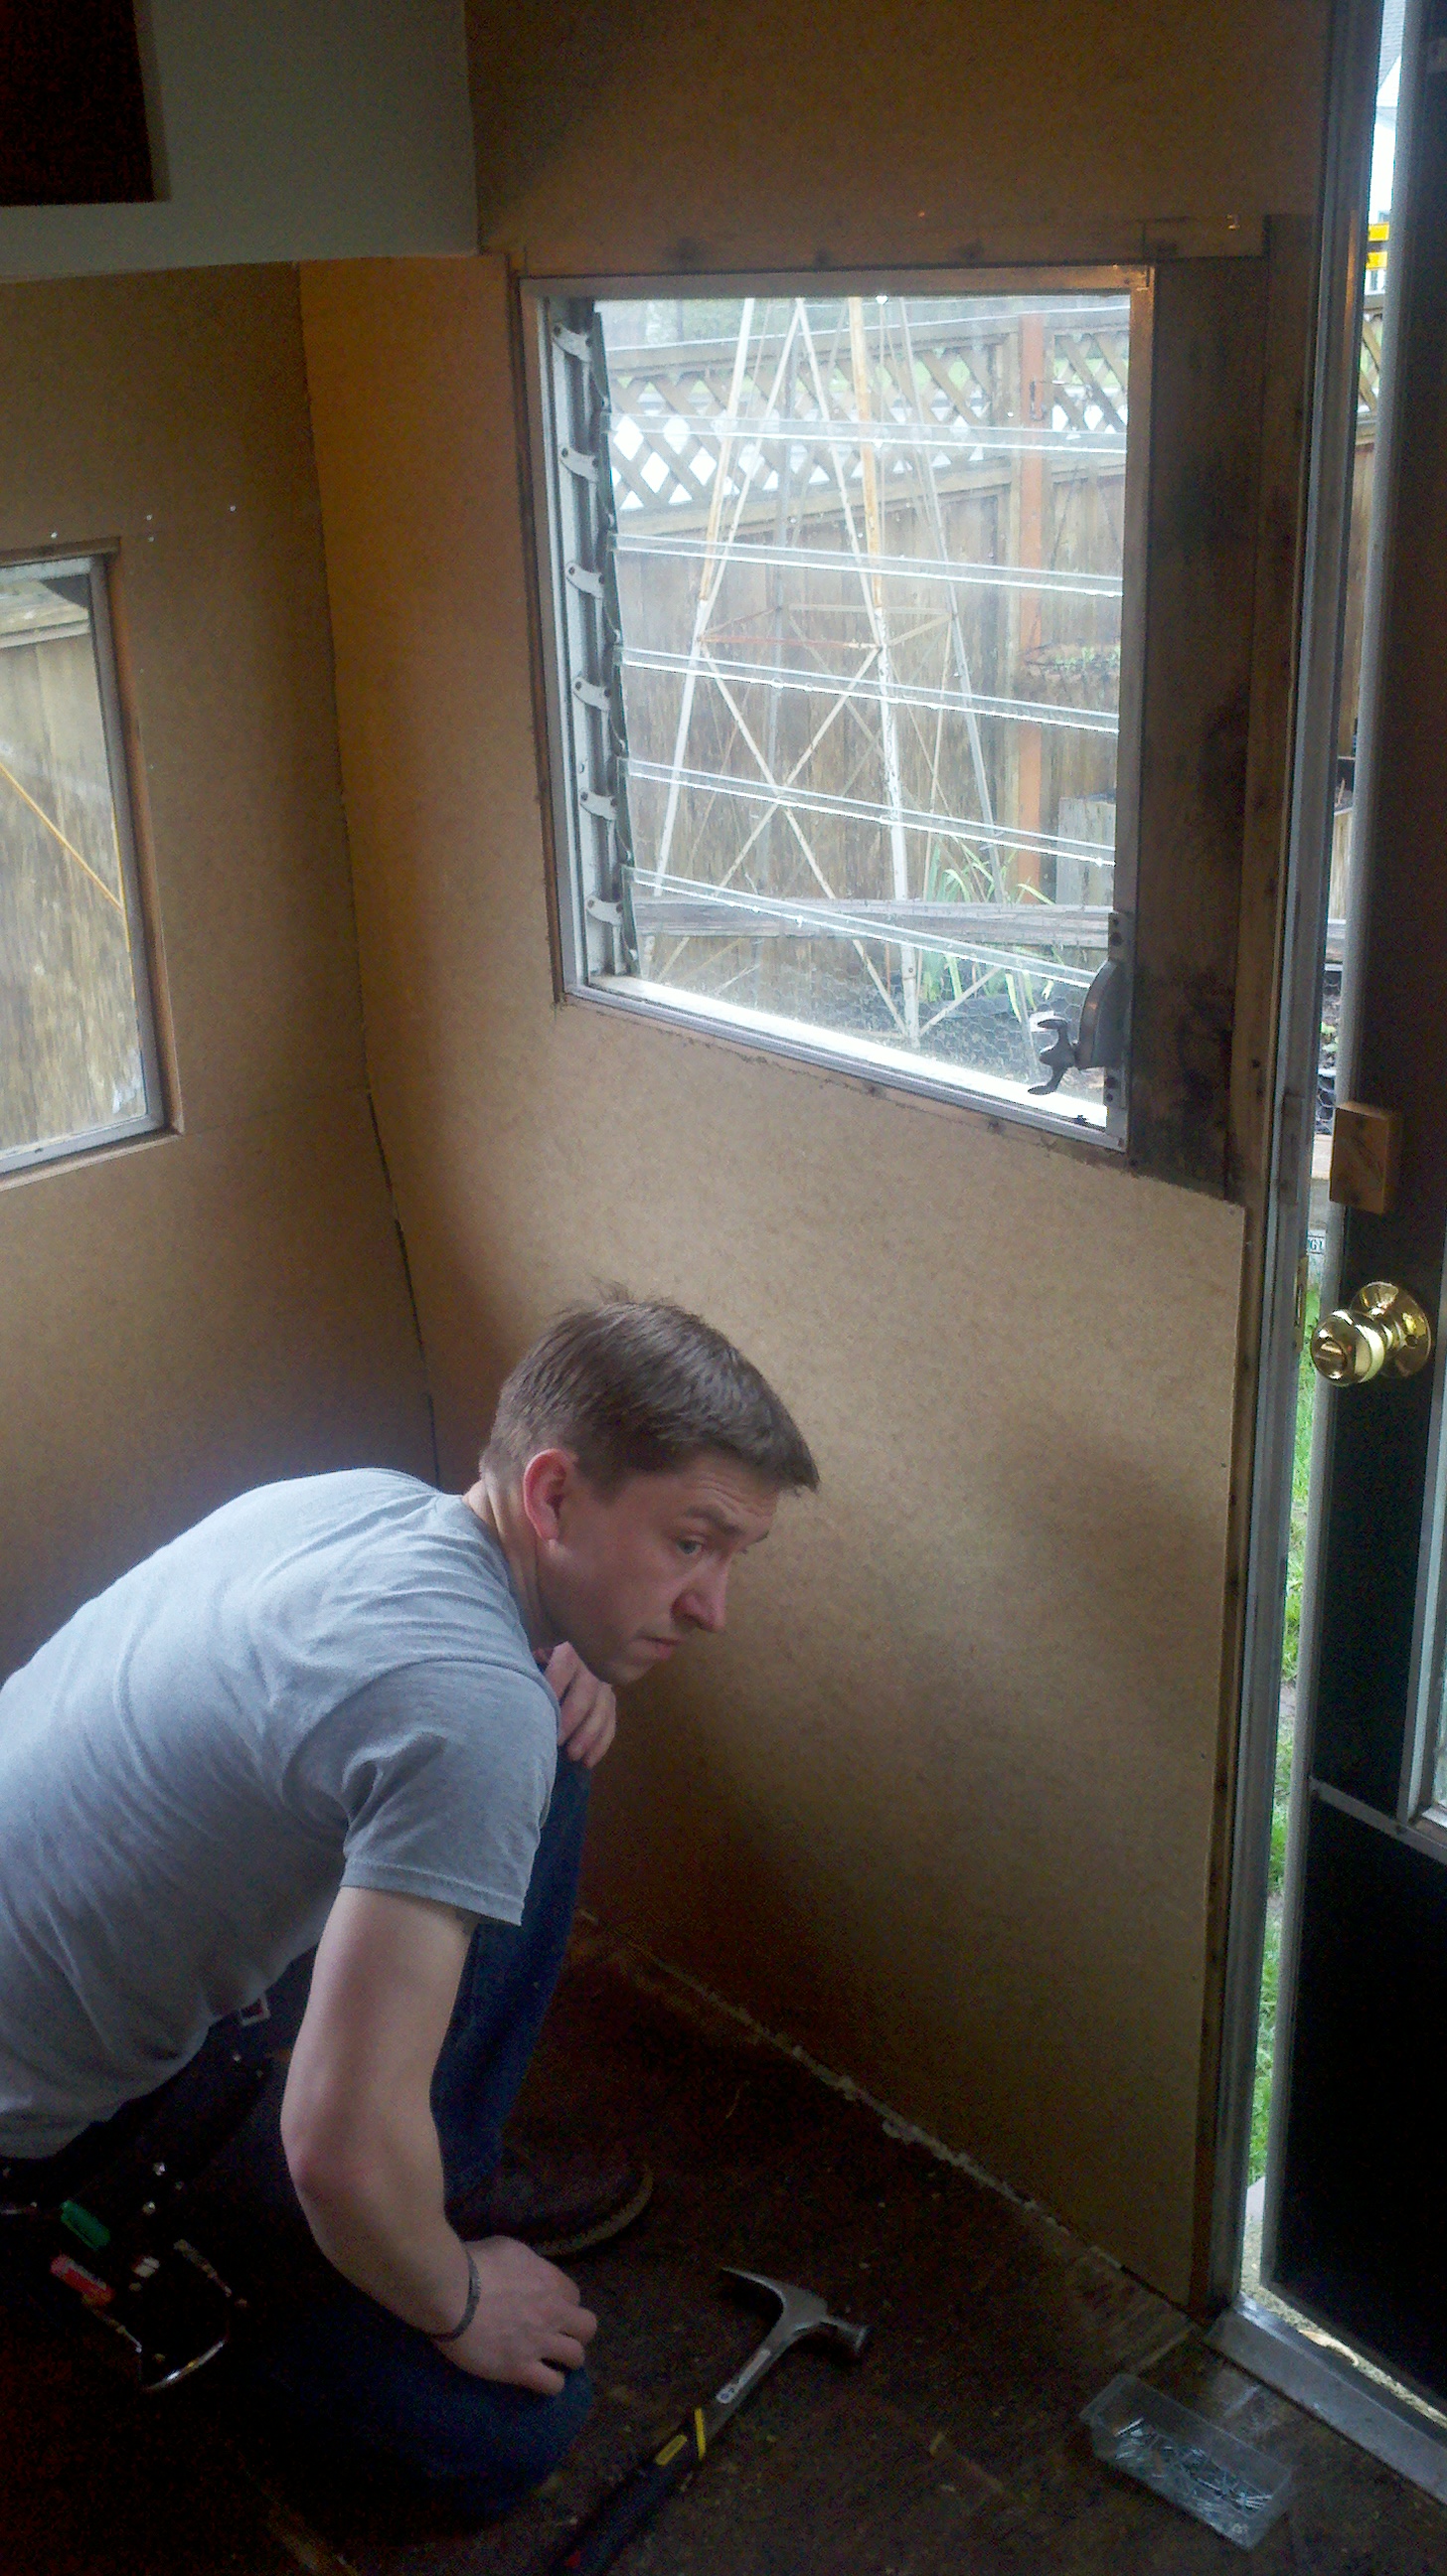
So we began ripping out pretty much ALL the walls. 😦 Blessing in disguise though, because then we could see if there were any more “trouble” spots and we could put in new insulation. It’s the pinks stuff used in houses, the original insulation was paper-thin. After reinsulating this little camper, it should be like a warm little sauna in there. 🙂

no walls    nowall5

Before                                                                                          After

nowall2      nowall4

Before                                                                    After

nowall3

I am really itching to get in the trailer and get the molding up and start on some painting. If it means I get in and help get the insulation done, so the walls will go up faster, then I will do it! Check out my cute cowgirl boots! 😉

2013-03-10 22.32.24     2013-03-10 22.43.02

Remember the wallpapered cabinets with the white fence and flowers ALL over? Well, that had to go! So, the other night, I sat on the living room floor, turned on my tv shows and got to work on those cabinet doors. Come to find out, it was pretty easy ( for the most part) to get the wallpaper off. Just, boiled up some water and got my scrubby and rubber gloves out. Used the scrubby to moisten the paper with the boiling water and began peeling it away in large chunks. I have also heard if you use boiling water and fabric softener, that works well also for stubborn wallpaper.

After those were done, got to work painting the rest of the cabinet doors and putting the hardware back on. OOOOoooooo I am so excited to start putting things back IN the trailer, instead of taking things OUT. 🙂

2013-03-14 21.17.09    2013-03-14 21.19.59

2013-03-16 15.09.33-1

Found some frames at target the other day…. they were on sale and I had coupons for them. They came out to be .50 ea. A bargain right?! I want to put a few frames up in the trailer and change out pictures of us as we start visiting national parks, state parks, and camping trips. Don’t think I will keep them the bright green color though, not sure how well it will go with everything else in the trailer. We will just see, I guess. I thought about spraying them a darker green….. Thoughts?

flags  flags2 flags3

While, I am anxiously waiting to get in the trailer and start decorating, I am trying to find things to make and do. Started noticing on some of the vintage trailers, people would have these pendant banners hanging inside or outside of the trailer. Thought it was cute, had some left over quilting fabric. Decided to sew some up and hey, if in the end it just doesn’t work, oh well, it was just a quick, easy little project. 🙂

2013-03-16 17.23.42    2013-03-16 18.01.53   

I have my triangles cut and sewn right now, but need to get some rope like material to piece it all together. I’ll be sure to post the finished product when I am done. 😉

2013-03-16 16.10.06

So we just celebrated St Paddy’s day a few days ago, and the Handy Husband wore a cable knit sweater ( found at goodwill for a dollar! can you believe it!) out to a St Paddy’s day breakfast after work( he didn’t really want me to show this). After, the sweater served its purpose, I thought it would make a nice pillow for the camper, so I got right to work cutting it up.

2013-03-18 13.58.24

The sweater was pretty large and I wanted to get 2 pillows out of the front side, but it just wasn’t big enough for the size of pillows that I wanted, so I am making 2 pillows using the knit from the front of the sweater and the other from the back of the sweater. The pillow sizes when done will be 24 x 16. Oh, and the back of the pillows is just a plain cream cotton material that over laps ( kinda like some pillow cases)

2013-03-18 14.09.14 2013-03-18 14.23.44

what ya think of that ingenuity? 🙂

Progress on Our Little Trailer

2013-03-05 13.50.23

So, we did not get much time to work on the camper this weekend. The Handy Husband had his weekend warrior duties and between rain showers, did not leave much time. For the one day we did get to work on it, quite a bit got done. I finally took a picture of the trailer as it sits in our backyard. The picture I used in the other posts was from the previous owner. When Tony starts working more and more on the outside he will be wishing we had a big indoor garage, or at least a covered parking area. well…. what do you do? make do with what you got. 🙂

2013-03-05 15.06.55 2013-03-05 15.06.29

This is the back half of the trailer, where the couch was sitting. We found some more rotted wood, so Handy Husband took out what was bad and replaced with new. It’s not the prettiest to look at, but it sure is sturdy.

When we brought the trailer home, we noticed the signal lights were not working correctly, so this is also the time we tackle that problem, while we have the walls open to figure out the wiring and put in new  ( if need be).

2013-03-05 12.30.36

And yes, new wiring was needed…

2013-03-05 13.49.31   2013-03-05 13.51.26

Some old wiring was on the outside of the trailer and held with some type of putty “junk”. Wire got rerouted to inside the trailer, and surprisingly, no major electrical shocks to the Handy Husband(yet).

2013-03-05 12.03.15

This old felt pendant was one of the other cool and nifty things I found in the trailer. It will definitely go back in the trailer, hanging up somewhere for all to see. I will keep my eyes peeled to try to find a few more to go with it.

2013-02-26 16.49.20  2013-02-26 16.47.54

Ok, so here it is, the paper mache antlers. I finally used craft paint to keep the purple tissue paper from bleeding through and I cant wait to put them up in the trailer and see how they look.

IMG_1029

We were up close to Seattle yesterday, and decided to stop by IKEA and grab a few things. I had a list….. so we could get in and get out.” You let me down IKEA, you let me down.”

The frame sizes I had written down were not the sizes they had in stock at the store. 😦 I really wanted to grab a few sheepskin rugs to throw on the back of the seats (yeah, they were out of those!), and we couldn’t find these little spice racks! ARRGH. Had to FINALLY ask for help, and customer service found the racks in a tiny little corner of the store( Thank You.). On the flip side, we found some pillow forms for next to nothing, that will fit my moose covers, and a nice comforter in the AS-IS for half off(woot woot). Also found a cool pillow ( I think) that has a geometric pattern (see below) that kind of reminded me of a native american design. Tony had differing ideas…. 😀 guess who will win that argument. 😉

lappljung-ruta-cushion-cover__0149803_PE307967_S4tejn-faux-sheepskin__0146820_PE305815_S4

Our Little Vintage Trailer

camper project11

We were busy bees this weekend.
Here is what the Handy Husband got done on his days off.

1_IMG951245    1_IMG953257
We had to replace some rotten wood in the far left front corner of the trailer.
IMG_4880
Then he put in new support beams across the front end of the trailer ands sealed some spots with expanding foam.
IMG958087
Next, came the insulation. Pretty the sure the insulation we found was orignal. It was thin and in bad shape, so he replaced with some thicker stuff. Keep us warm and cozy. 🙂
IMG953860
Then up went the new “wall”. Can’t wait to get my paintbrush on that!
After deciding he was at a stand still for the moment he decided to rip into the back of the trailer, where our couch is… ok, WAS.
IMG953569

IMG_9627

Here is what I got done.
First, I got to work on an “art” project. I was inspired by a paper mache antler from west elm. The jury is still out on it. I am not done with it, but we’ll see how it turns out….. Could be brilliant, or just plan crazy.
2013-02-22 19.30.45-2
Made a wire form of my antlers and punched them through my cardboard “mount”. I hot glued the wire in the back and at all the joints were I attached the spikes. It looks real pretty, I know. 🙂
2013-02-22 20.29.14
After it all the glue was dry and had hardened up, I got out a stack of newspaper and cut them into strips. For the adhesive, I just used a mixture of elmers glue and water. About half and half. Set up my little work station on the kitchen table and got to work wrapping the glue and paper around the form.
I also had a hair dryer set up on a stand, so that as I did a few layers, I would let it sit and dry, and then do a few more layers…
2013-02-22 21.29.06
For the most part I am done with layering on the paper and its pretty dry, but still looks a little rough… I don’t know? So, I thought, ” maybe if I added tissue paper it wouldl help smooth things out.”
So, I did. All I had, was purple….
2013-02-24 13.03.21     2013-02-24 13.42.31

The Inspiration:

camper inspiration 7

Like I said, I am still not done with it, and I don’t think it looks half bad. Word to the wise though….If you are planning on painting it white, don’t use purple tissue paper. It keeps bleeding though. 😦 But , I will be sure to let you see the finished product when it’s all done.

Next up, I worked on the drawers a little more. The wood was pretty dry, so I rubbed them down with some Howard Feed-N-Wax. It cleans, conditions and preserves. Plus, it makes them smell really good. Like oranges! 😉
2013-02-23 15.01.01
It was decided that the inside of the drawers were old, dirty, and kinda gross, so, I painted them. We had some dark green semi gloss used to paint the chicken coop, and I thought I might as well use that up. I think the green looks alright, how about you?
2013-02-24 11.09.12

Then I made a trip to the fabric store…

2013-02-23 16.22.36

Bought some classic red gingham for the table-cloth.(and more vinyl to hopefully finish up the bench seats)

Discovered some extra material in my craft closet to do some pillows I had found online and liked. Found the closest image I could of the moose online and printed it out. Then cut out the paper moose. I used that moose to trace one on to some clear contact paper. Cut out the trace on the contact, which gave me my stencil.

2013-02-23 15.36.33
Applied the contact paper to my material and used a sponge brush and paint to apply the moose.

2013-02-23 20.53.56

2013-02-23 20.56.45

2013-02-23 22.35.16

Now all I need is my pillow form to stuff inside. 🙂
My Inspiration:
httpwww.notonthehighstreet.comrusticcountrycraftsproductmoose-cushion

And the last of my projects for the weekend was to repaint the camper door. (I am a painting fool!Love it!) The old door was a brown color and had a bunch of rust on the bottom half.

2013-02-17 12.08.21 2013-02-17 12.09.05

You can kinda see it down in the corner there ^.  We sanded as much as we could off, and then I got to work taping everything off and sprayed it down with a primer, to hopefully seal it in. Then applied a few coats of basic black paint.

IMG_5635 IMG_2442

2013-02-24 19.55.07

TADA! what do you think? All that hard work. oh, and while I’ve got you here, what color do you like the best on the wall next to the door. Even though our trailer in missing half its walls right now, I am already trying to figure out a color plan for the walls.

Until next time… 😉

My Little Vintage Trailer

camper project11
The Handy Husband is back to work, but itching for the weekend, so we can get more work done on the trailer. I have been stuck inside the last few days, as the pacific northwest weather has turned on me. 😦 gotta love that liquid sunshine. Been keeping busy though, working on covering the cushions to the bench seats. Cause, let me tell you, they NEED IT.

Not sure how the fabric I chose to recover with will wear….again, this is a learning process, but I decided to do the seat in a grey flannel and the back rest in a grey fleece. I was at Wally World (aka Wal-Mart) the other day and found some remnant vinyl to use on the back of the cushions, and it was navy blue, so I thought, “well, hey. close enough.”

camperproject13
BEFORE

camper project13
AFTER

camper project 17

camper project 14<

Oh! and when we were cleaning out the trailer the other day, we found some treasures that I thought were pretty awesome, and will mostly likely be going back into the trailer when its all done.

camper project 16

camper project 15

Like, I said, the handy husband is really itching to get back in there and get some more frame work done, so we can move on to the more fun stuff, such as , painting, hanging, decor…. But when he is out there working, he is not alone. Our two boys have already staked a claim to that little trailer. I think they think its their own new little play house. They sit out there and listen to the radio with dad, or get their pillows and blankets, pile up on the back couch with popcorn and books. They can’t wait to go camping!

camper project5

Last night, I went cruising around the net to get some more ideas and inspiration for our little Floyd, and I found some fabric and things that I think I really like. Let me know what you think. 🙂

fabric.com2

fabric.com3

Large_UP-413
All three from Fabric.com

httpwww.retro-redheads.comBait-Tackle-Towel-Set-p43.html
Towels from retroredheads.com

httpwww.notonthehighstreet.comrusticcountrycraftsproductmoose-cushion
pillow from httpwww-notonthehighstreet-comrusticcountrycraftsproductmoose-cushion1.jpg

Trim Your Tree for Cheap: Gingerbread People Ornaments

ok, I kinda got this idea from “the great Martha”. In her directions though, she makes her ornaments into birds, and I realize you could make them any shape you want, but for me, it made more sense to make them into gingerbread people. I mean, the dough is BROWN! How does that not scream GINGERBREAD? 😀 To each their own, I guess.

2012-12-05 21.29.09

materials needed:

1 medium bowl
1 cup ground cinnamon (note: to get a large amount of cinnamon, I bought in the bulk section at Winco for just under a dollar)
1/4 cup applesauce
Craft glue (one full bottle of elmers should work)
Rolling pin
Wire rack
Baking sheet
Craft Paint, Glitter, Beads, etc.
Wood skewer
Length of thin ribbon for each ornament or wire hooks

2012-12-05 13.36.09

First thing you are going to want to do is mix together 1 cup ground cinnamon and 1/4 cup applesauce using a rubber spatula.

2012-12-05 13.40.26

Next, stir in 1/2 cup craft glue. Stir the dough until consistency is smooth and dry. Let stand 1 hour.
One thing I should mention here when stirring, unless you LOVE cinnamon, cover your nose and mouth and stir carefully. Cinnamon is very fine and will easily get stirred up into the air and up your nose.

2012-12-05 13.45.17

After an hour, I suggest working with small portions of dough, like, a 1/4 piece at a time. Roll out to about 1/4 inch thick. If your dough should stick to the rolling-pin or the counter top, sprinkle a little cinnamon over it like you would with flour and cookie dough. If the dough is too dry, spritz with some water.

2012-12-05 14.43.07

After cutting out figures with cutters, I used the flat end of a wood skewer to make a hole to hang ornament from.
Arrange them onto a cookie sheet with either parchment paper or non stick mat and put into oven for 2 hours at 200 degrees. flip once.

2012-12-05 15.06.37

When they are all done, the last step is pretty much free creative rein. decorate however you wish. paint, glue, glitter, etc. I painted mine like gingerbread men and women, but do what you feel. 🙂 With them being 90% cinnamon, they should smell pretty nice. However, mine in the end didn’t have much smell to them at all. I wonder if its due to the quality of cinnamon purchased?

2012-12-05 21.33.43

Trim the Tree for Cheap: Candy Cane Ornaments

candy cane I think I made these little beauties back in my girl scout days, I cant remember. I do however remember making a bunch of these candy cane ornaments a few years ago (about 10, to be exact) when I was a poor college student and didn’t really have the money to decorate my tree. Sad, I know.

What I cant believe, is that ten years later, I STILL have them and I use them EVERY year on my tree. They were super cheap and super easy to make and you can make a bunch in all different color patterns. Whatever floats your boat. 🙂

Materials Needed:

(take a trip to your local craft store)
-White pipe cleaners
-Little triangle beads in lots of different colors
-Ornament hooks/or ribbon (i find the hooks are easier)

Stuff you probably already have:
-Scissors
-Measuring Tape or Ruler

1. Measure out your pipe cleaners to about 5 1/2 to 6 inches (it’s not an exact science)
2. Hook about 1/4 inch of the pipe cleaner up so the beads don’t slide off.
3. Start adding your beads in whatever pattern, or be crazy and just add random colors. you choose. 🙂
4. Once you’ve added enough beads and have reached the other end of your pipe cleaner, leave about 1/2 inch to hook cleaner back around to lock the beads on.
5. Bend into candy cane shape
6. You can hook a wire hanger through the top of bead on the candy cane, or be fancy and use a ribbon. Like I said earlier….hook, for me was easier.
7. Hang on your tree and enjoy!

2012-12-08 17.39.28

NEW and improved chicken coop

Today was the day! The hubby finished the new chicken coop and not a moment too soon. With in minutes of being done, the rain came down. The girls moved in, and are happy and dry in their new digs.

This is the old coop that was in the garden, that we moved out of the garden, into the yard, to build the new coop.

The start of the rebuild. The pallets came from a warehouse my mom works at.

ok, so this pic is mostly of the garden, but you can see we painted the pallets in the background a pretty green. 🙂

Here it is almost finished. All that’s left is to move the chicken house back over.

You can see a dismantled chicken run in the background with a missing house…..

…that’s because the house has been moved over to the new run, with the hubby putting finishing touches on the chicken wire.

With the new run and new roof, I am hoping the chickens will stay drier this winter and happier. They had a few roosting bars in their coop/house, but we added more bars for them to hang out on at the far end of the run ( by the green pallet) This run is also longer, so they have more room to spread out and we made it so that the feed and water are now hanging, which will hopefully mean we are cleaning out the water less (YAY!)

ps. if you didn’t notice the plants in the garden and the change in each picture…..this project took a few months to finish! what can I say….we are procrastinators. 🙂